USER GUIDE 12
Understanding Shells, Layer Height, and Infill
In order to achieve great prints, you first need to understand the 3D Printer's settings. Here we will discuss shells, layer height, and infill. These settings directly control the surface finish, durability of the print, and density.
SHELLS AND PARAMETERS
Think about each printed layer of an object as a two- dimensional drawing laid out on the X and Y axes. In this case, the number of shells on the object refers to the number of times the outline of the drawing is retraced. If the printer only traces the outline once, it is said to have one shell, if it retraces the outline a second time then it is said to have two shells.
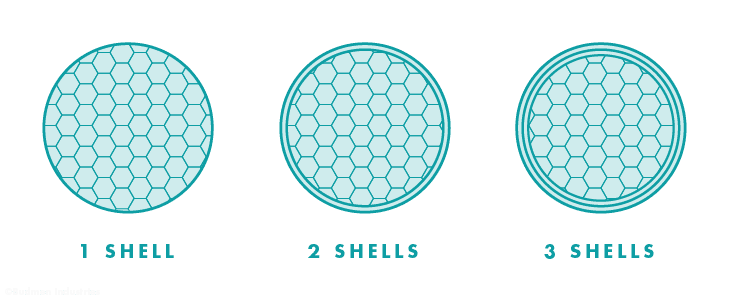
Shells, or perimeters, are the outer most layer of the object. They are ultimately the part of the object we see and interact with. The more shells on an object, the stronger it is. However, adding shells will also increase the print time significantly.

PRO-TIP
Use fewer shells when prototyping or printing decorative objects. Use more shells when printing items that will be under more stress.
LAYER HEIGHT
The number of layers in a print or the object’s resolution, is determined by the layer height setting. Layer height is measured in microns (one millionth of a meter).
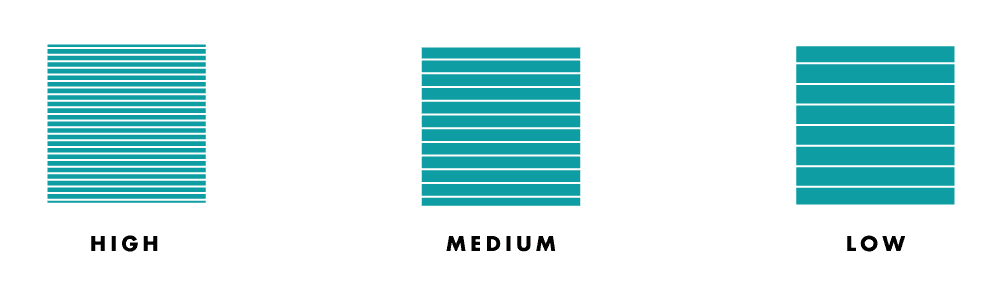
High resolution objects use many thin layers to create smooth objects. It becomes difficult to see individual layers with high-res printing because layers are printed at a thickness of 100 microns (0.1mm). This is as thin as a sheet of paper. Items intended for display purposes are typically printed in high resolution.
High-resolution objects take longer to produce than low resolution ones. This is because for every one layer of a low-resolution object, there could be 5 times as many layers in a high resolution object. Each of those layers takes more time printing, but it can make a substantial difference in visual quality.
Low resolution objects are made of fewer and thicker layers. With low-res objects, it is very easy to see the individual layers. These objects may feel rough to the touch. Prototypes and everyday objects can usually be printed at lower resolutions and at faster speeds.
PRO-TIP
Use a bigger layer height for prototyping and rapid production, use a smaller layer height for display objects and more-accurate tolerances.
INFILL
Infill is the material used to fill the empty space inside the shell(s) of an object. Infill refers to the density of an object. Infill is measured by percentage, so an object printed at 100% infill will be 100% solid. More infill will make an object stronger and heavier, however, it will take mush longer to print. Likewise, less infill is lighter and faster to print.
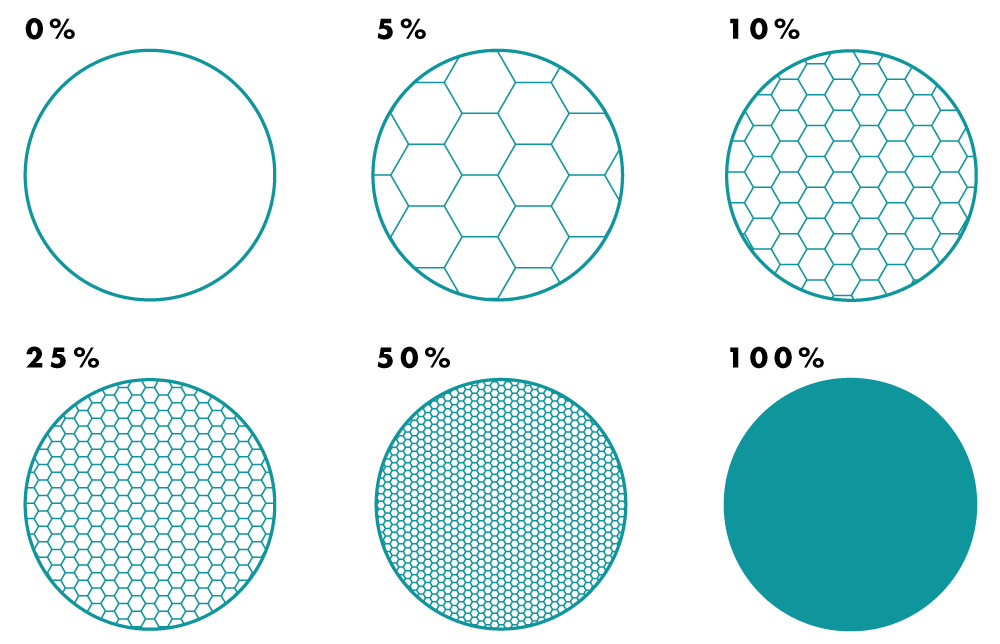
Items printed for display purposes rarely need more than 10-20% infill, but functioning mechanical parts need 20-75% infill.
A 3D printer can extrude infill in several different patterns. Some slicing programs create a grid pattern while others use hexagonal or other geometric patterns.
PRO-TIP
Use less infill on test objects and display items that won't be subjected to much stress. Use more infill on functional and durable parts.